How are you blogger friend wherever you are, hopefully in good health. This time Gourab Design will provide tips on How to create Custom Subdomain in GoDaddy and Setup in it your Website .
For those of you who already have a blog with a custom domain or also called TLD (Top Level Domain), you can also create several sub domains from the parent custom domain that you use. This is useful if you have another blog that you want to link to a custom domain so you don't need to rent a new custom domain anymore and it's quite useful to save your expenses.
For example, the custom domain address that you have is https://www.gourabdesign.com and if you want to add another blog for example with a technology niche, you can add sub domains with the name tech or techno for example
How to? 😕 Let's follow the steps below.
For more information watch this full video :- 👇
Here is an example of a sub domain that I created:
Okay, that's all for tips on How to Create Sub Domains from Blogger Custom Domains. If you are still confused about the steps, we can discuss it in the comments column. Thank you and respect.
For those of you who already have a blog with a custom domain or also called TLD (Top Level Domain), you can also create several sub domains from the parent custom domain that you use. This is useful if you have another blog that you want to link to a custom domain so you don't need to rent a new custom domain anymore and it's quite useful to save your expenses.
For example, the custom domain address that you have is https://www.gourabdesign.com and if you want to add another blog for example with a technology niche, you can add sub domains with the name tech or techno for example
https://technicdost.gourabdesign.com .
How to? 😕 Let's follow the steps below.
How to create unlimited Custom Subdomain in GoDaddy and Setup in it your Blog Website
- First, log in to your member or client area domains. Here I use godaddy.com, if you use another service, you can adjust it to the client area domain that you are using.
- Then click the Domain menu and select what domain you want to add a sub domain to. Like the example here I will add sub domains from the gourabdesign.com domain.
- Once selected, it will bring up menus such as Nameservers, manage DNS, etc. Select the Manage DNS or Manage DNS menu.
Creating CNAME on godaddy.com
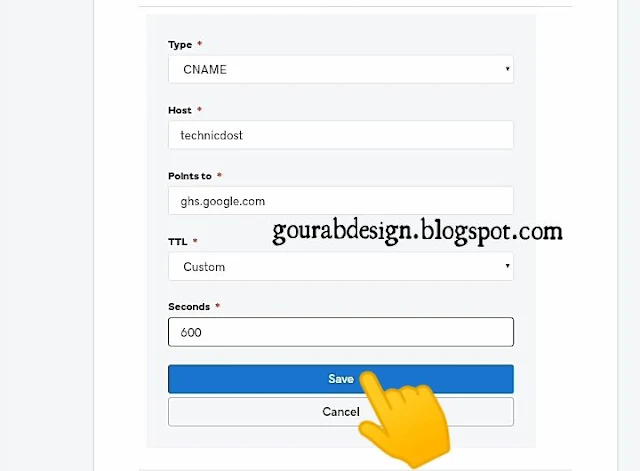
- Then add a new record in the Manage DNS column, for example here I add a new technicdost record and add ghs.google.com to the CNAME column.
Well, now my friend only needs to wait for the propagation time needed about 1-3 hours or usually faster than the new sub domain you made.
Switching your BlogSpot blog to the Custom Sub-Domain
how to add custom sub domain in blogger
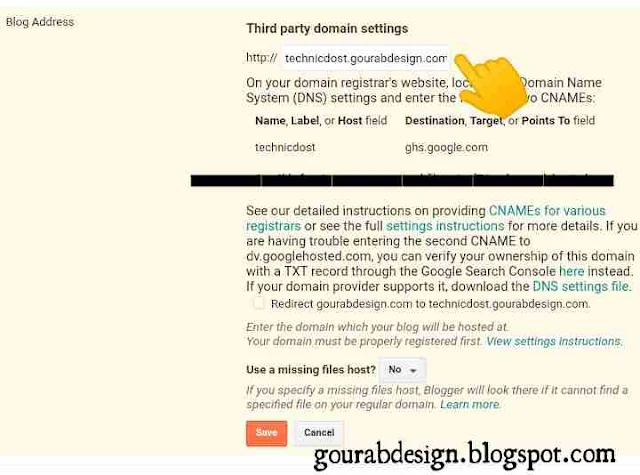
- Next enter the Blogger dashboard, then select the blog that you want to add to the sub domain you made. Then select the Settings menu> Basic> Blog Address and click on writing + Prepare a third party URL for your blog to install a new sub domain. Add the sub domain name in the column provided then click Save.
- Done, now enable HTTPS in the same menu. For tips, you can check here How to Enable HTTPS on a Blog with a Custom Domain.
For more information watch this full video :- 👇
Here is an example of a sub domain that I created:
Okay, that's all for tips on How to Create Sub Domains from Blogger Custom Domains. If you are still confused about the steps, we can discuss it in the comments column. Thank you and respect.


Nice
ReplyDelete